Build a Workout Tracking App Using Metabase
Table of Contents
Overview
I started lap swimming this year and once I discovered Metabase Actions I thought it was the perfect way to track my workouts!
This tutorial will show how to build an app to track swimming workouts using Metabase’s new Actions feature. For some general background on Actions, check out my corresponding post to this tutorial.
Assumptions & Prerequisites
Here’s what you need to build a dashboard Actions:
- Metabase version 0.46 or later
- A database to store data (MySQL, PostgreSQL, or H2)
This tutorial won’t go over setting up your Metabase instance. Metabase has great documentation on getting started. I also already have my database up and running, so I won’t cover that either. For this tutorial I’m using MySQL, but Actions will also work with H2 and PostgeSQL databases as well!
Database Preparation
Let’s start by going to our database and creating a table to hold the data for this project. All the SQL examples are written in syntax for MySQL.
Create an Empty Table
The first step is to create an empty table so we store the data for each workout as an individual record.
CREATE TABLE swim_tracking_metabase (
    id INT AUTO_INCREMENT PRIMARY KEY,
    start_date_time TIMESTAMP NOT NULL,
    duration INT NOT NULL,
    location VARCHAR(255) NOT NULL,
    distance INT NOT NULL,
    comments TEXT
    );
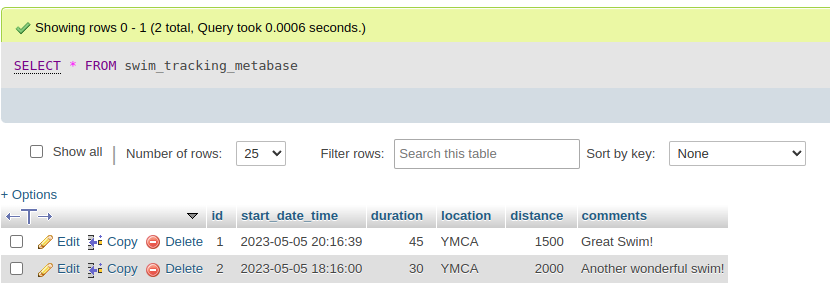
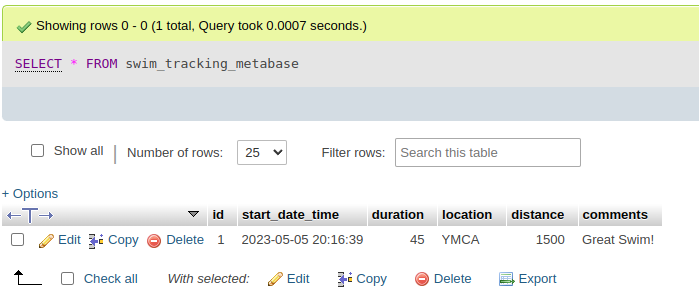
Add a Record to the Table
Creating the Basic Actions in Metabase works best with some data in the database to help with metadata, so let’s add a dummy record to the table. We’ll use Actions later to delete this record from the database.
INSERT INTO swim_tracking_metabase (
    start_date_time,
    duration,
    location,
    distance,
    comments
    )
VALUES(
    CURRENT_TIMESTAMP,
    45,
    "YMCA",
    1500,
    "Great Swim!"
    );
Add a User
Next, I would normally create a new user in the MySQL database to use in Metabase, but I already have a user added for my demo database so I’m going to skip that step. Metabase will need a username and password to connect to your database, and I recommend creating a dedicated user that has Read, Update, and Delete privileges.
Metabase Setup
Configure Database Connection
Once the database, table, and user are ready we can fire up Metabase and start configuring the database connection.
You will need admin permissions in your Metabase instance to create the database connection.
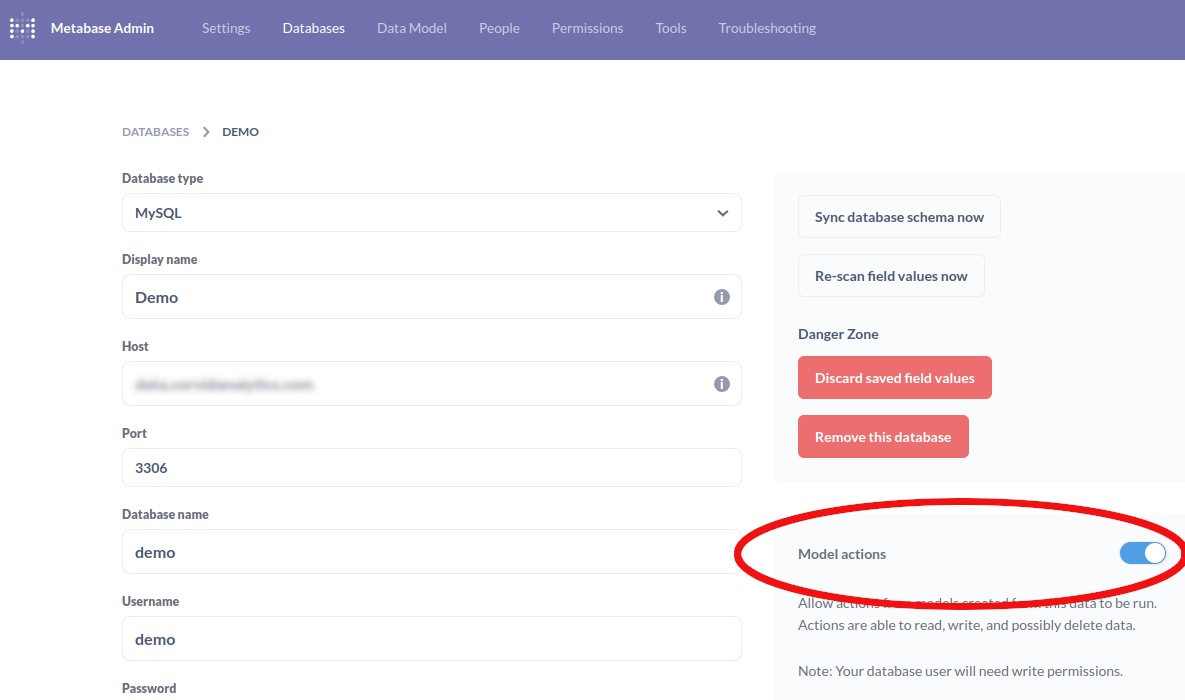
Open the Admin Settings and Databases tab, then add a new database. Your configuration will be specific to the flavor of database you are using, but one option that is key to making Actions work is to toggle “Model Actions” on.
Create a Model
Now that our database is ready to go, we need to create a Model. A Model is a layer that creates a curated dataset for users to create a visual, create a Question, or write a query against the Model. Models can combine many tables into a singular dataset, in this case we are going to create our Model from a single table.
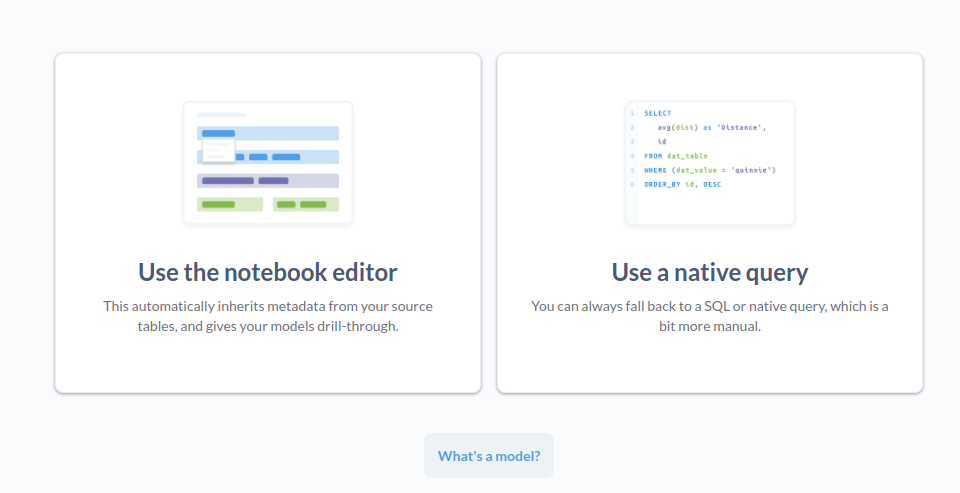
On the main page of Metabase, create a Model by selecting the New dialogue and choosing Model.

We will be using the Notebook Editor on the next screen. This lets us make Actions without using SQL, instead Metabase will generate the SQL for us. If you’re more comfortable with SQL you can use the Native Query editor option to build more advanced Actions.
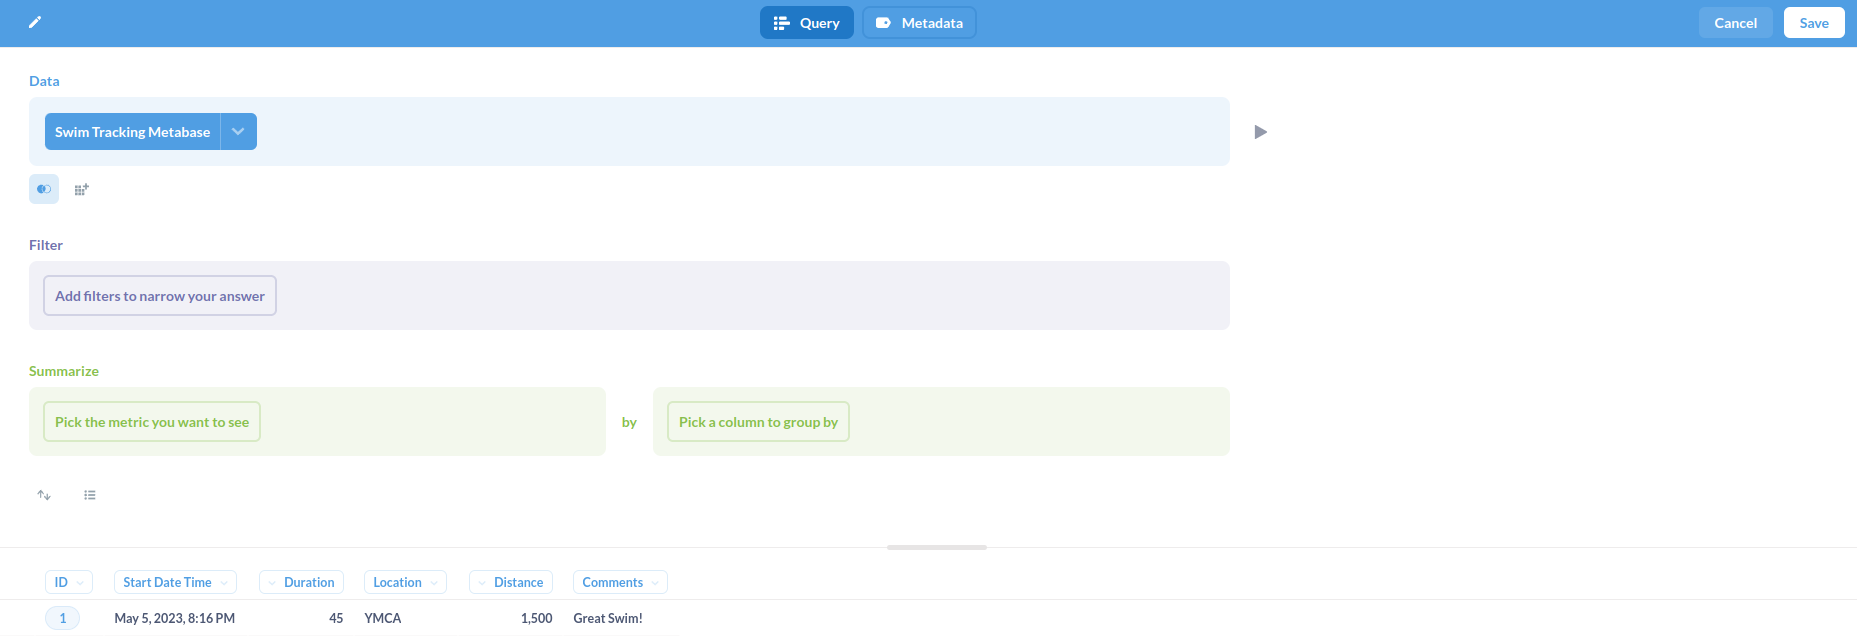
For our starting data, we will be using Raw Data since we are going to be working with a table that is in our database. Navigate through your database schema to find the table we created earlier called Swim Tracking Metabase. Notice that Metabase already made our table name more human readable by enforcing title case and swapping the underscores for spaces (swim_tracking_metabase -> Swim Tracking Metabase)!
In the Model Query editor, we can add filters, aggregations, or joins with other data. In our case, our Model is going to be a copy of the underlying table, so we won’t make any changes here. Click the run button to preview the data and you should see the record we added during our database setup. Click Save to save the query and create the Model.
Give the Model a clever name & description like Swim Tracking Metabase Model & A data model of swimming workouts I've done!, and select which Collection you want to save the Model in. Collections are like folders that contain the assets for a particular project.

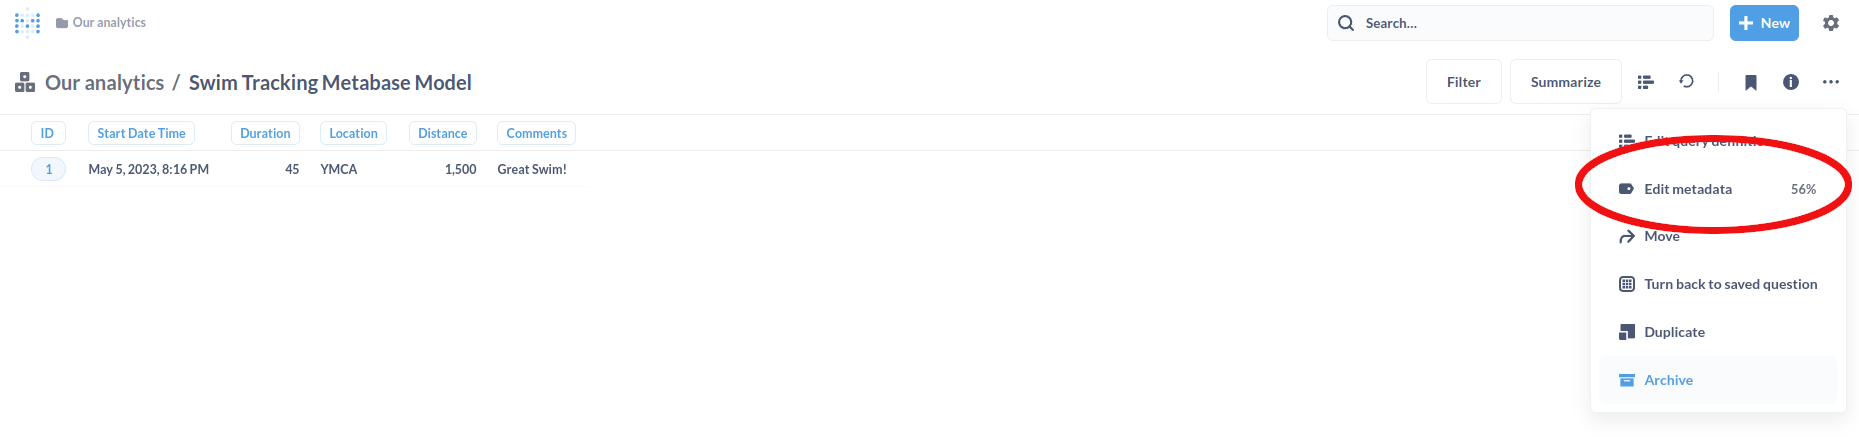
Now that your Model is created, a step that is optional, but I encourage doing, is completing the metadata. Click the ... for Model options and select Edit metadata.
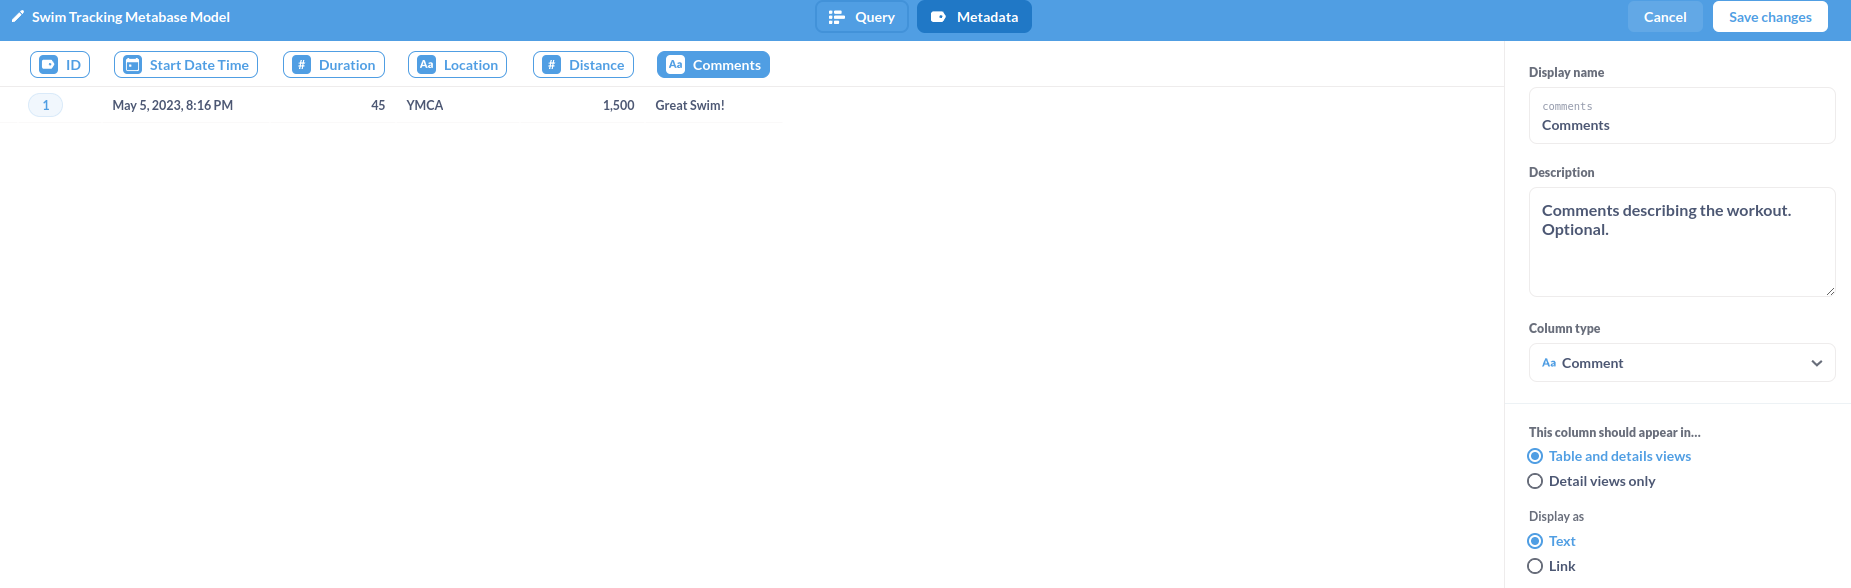
In this screen you can go column by column and define the metadata for your fields. This can help Metabase to build better Questions, and is a best practice, even though it isn’t strictly necessary for this Actions project. Here’s more info on curating your metadata in Metabase Models.
Create Basic Actions
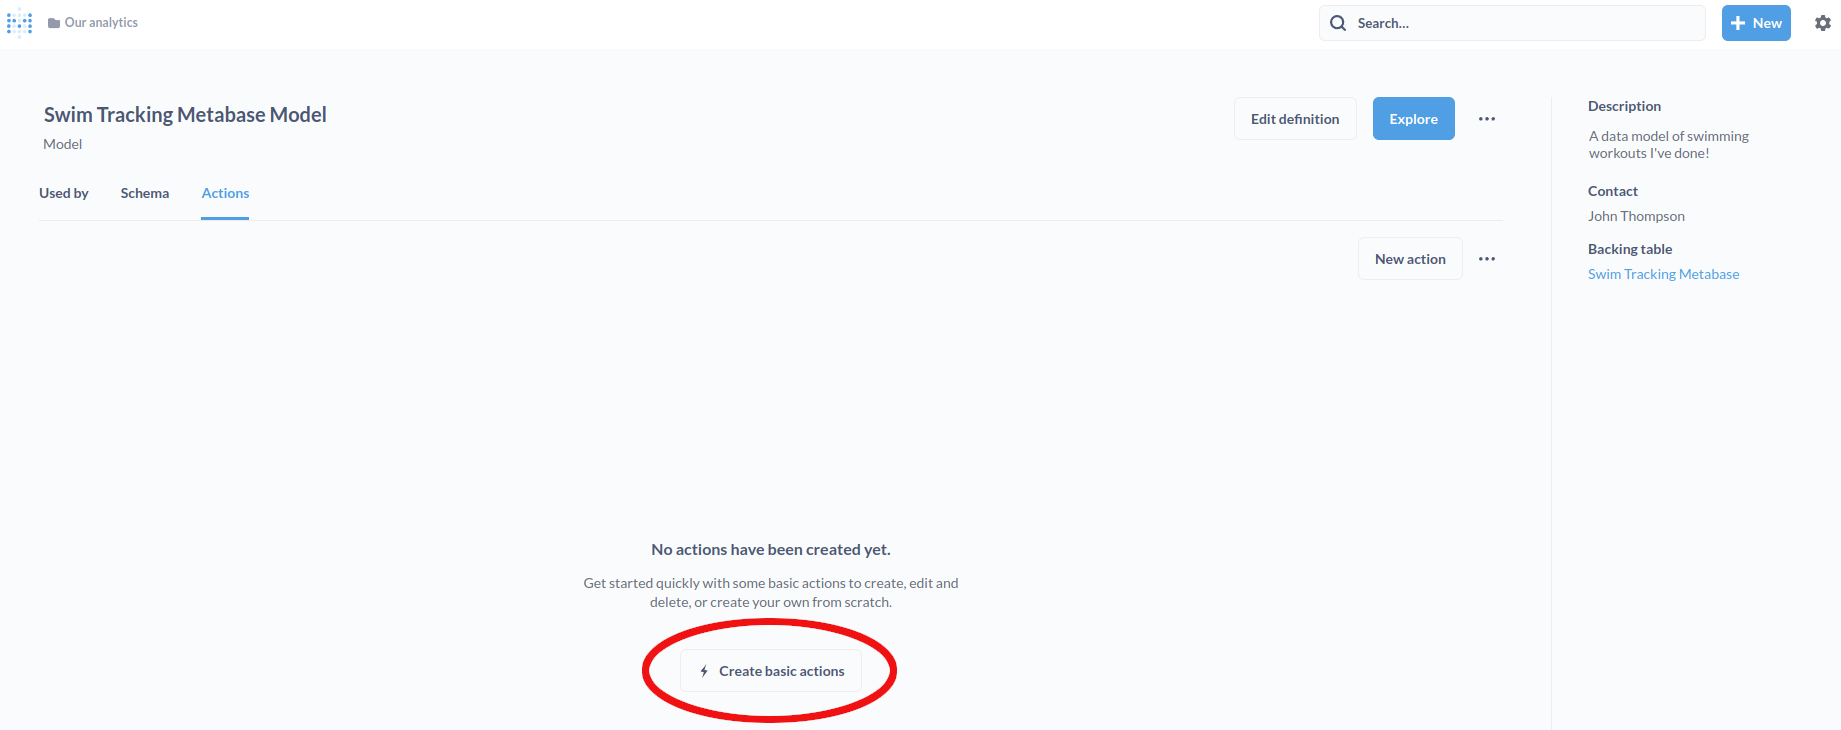
Now that our Model is created and curated, we can have Metabase create our Actions! In the Model screen, open the Model Details through the About menu by clicking the icon of an i in a circle.

Once in the Model Details menu, navigate to the Actions tab and click the Create basic actions button in the middle of the screen. This will have Metabase automatically create 3 actions to Create, Update, and Delete records from your database. Note that even though we created this based on a data Model, the actions will add/update/delete records from the underlying database table.
That’s all for the setup, now we can get to creating our Questions and the dashboard users will interact with!
Building the Dashboard
Create a Question
Our first step to creating an interactive dashboard with Actions is to create a Question. Questions in Metabase are the individual charts and tables that you can add to a dashboard. Go to the New button in the top right corner of Metabase and select Question. The steps to create a Question will seem familiar, they are similar to the steps we did earlier to create a Model. This time for our starting data, we will use our Swim Tracking Metabase Model Model we made earlier.
The Question we want to build is a table of all the records in our Model, sorted by most recent date. We won’t add any Filters since we want all the data, and we won’t summarize any of the data since we want each record to come in. We will add a Sort on Start Date Time and make is descending to show the most recent record at the top of the table. Clicking the play button next to the Sort dialogue will give you a preview of the data.
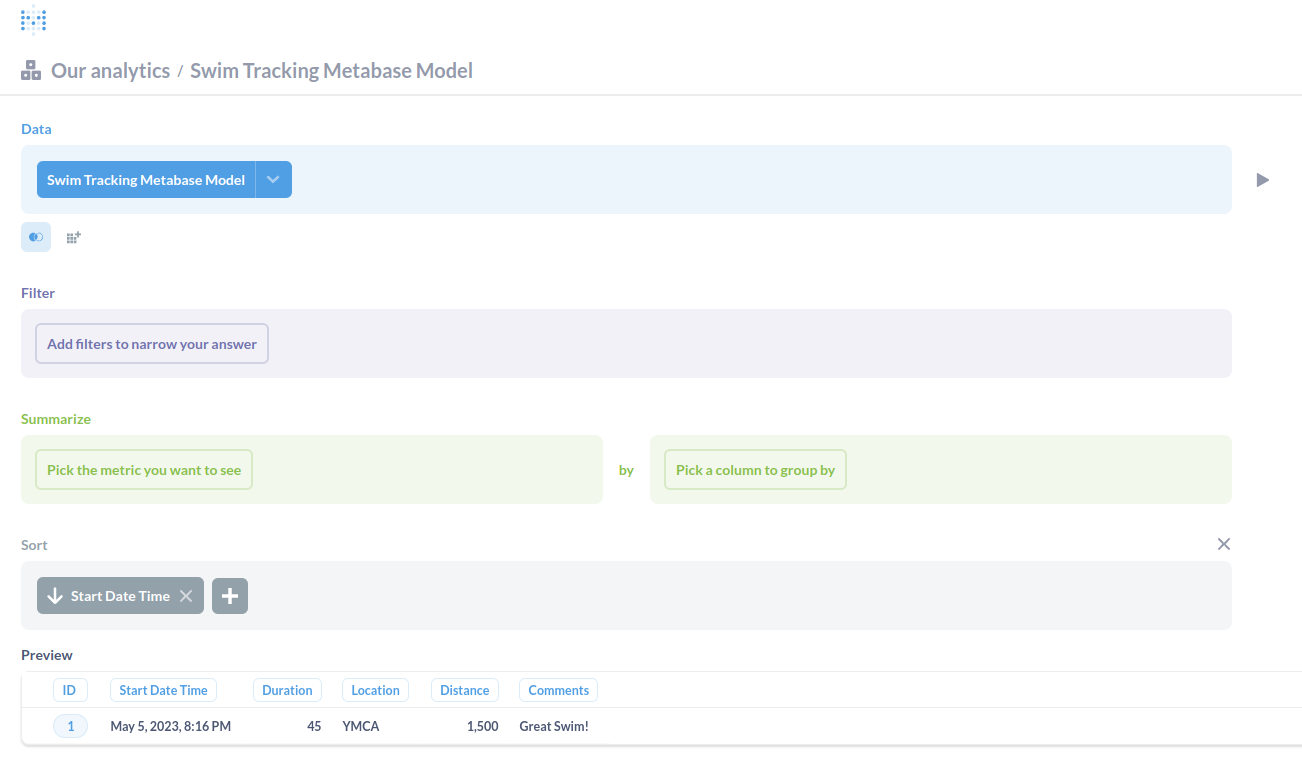
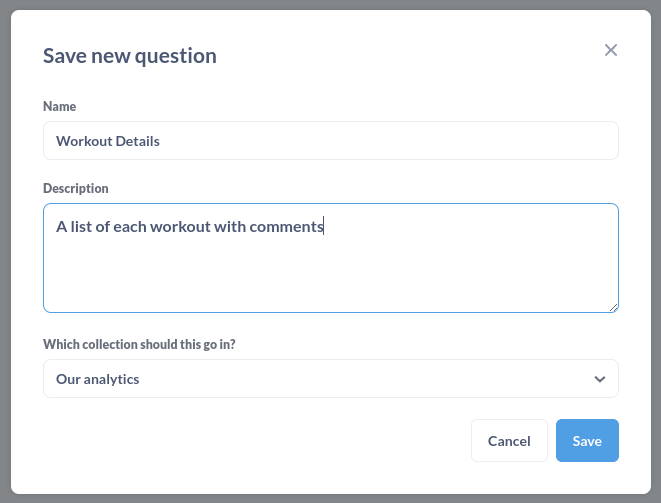
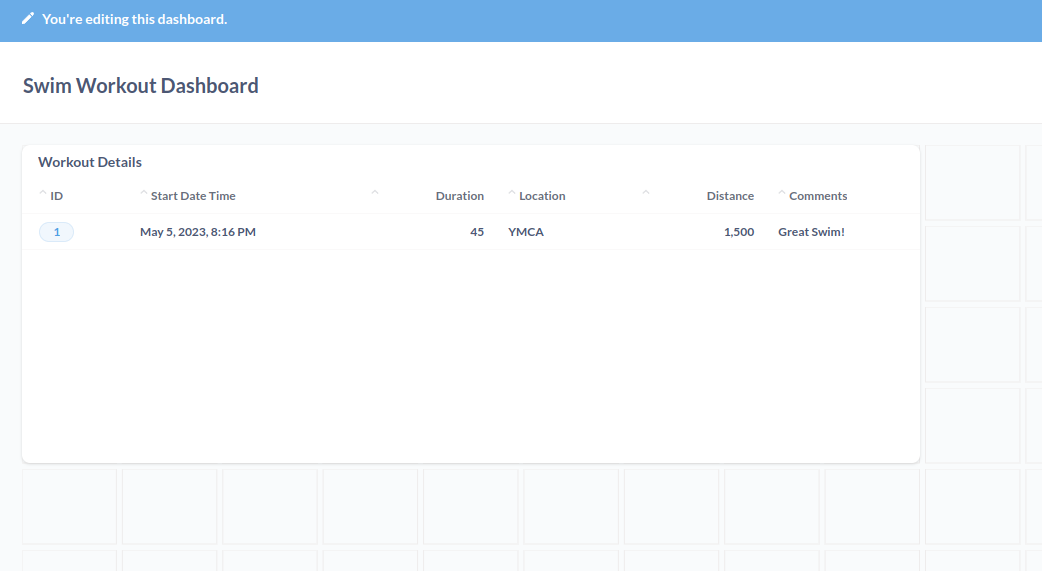
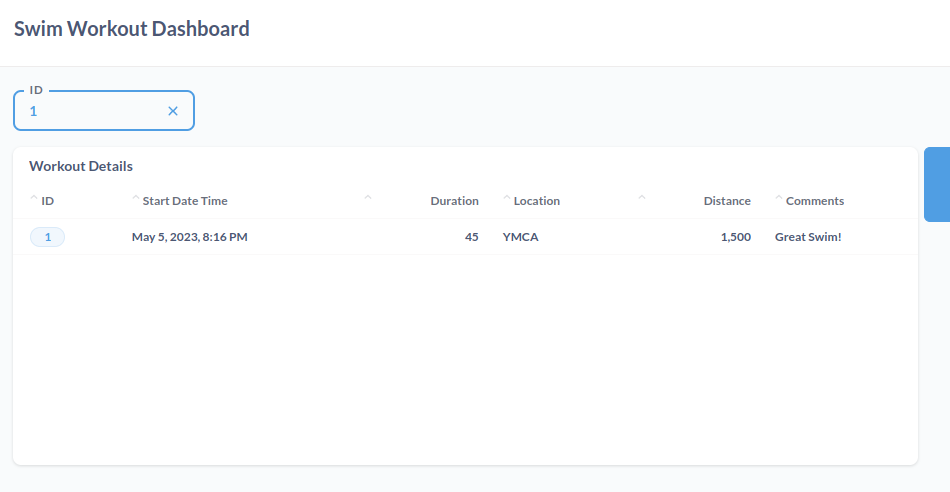
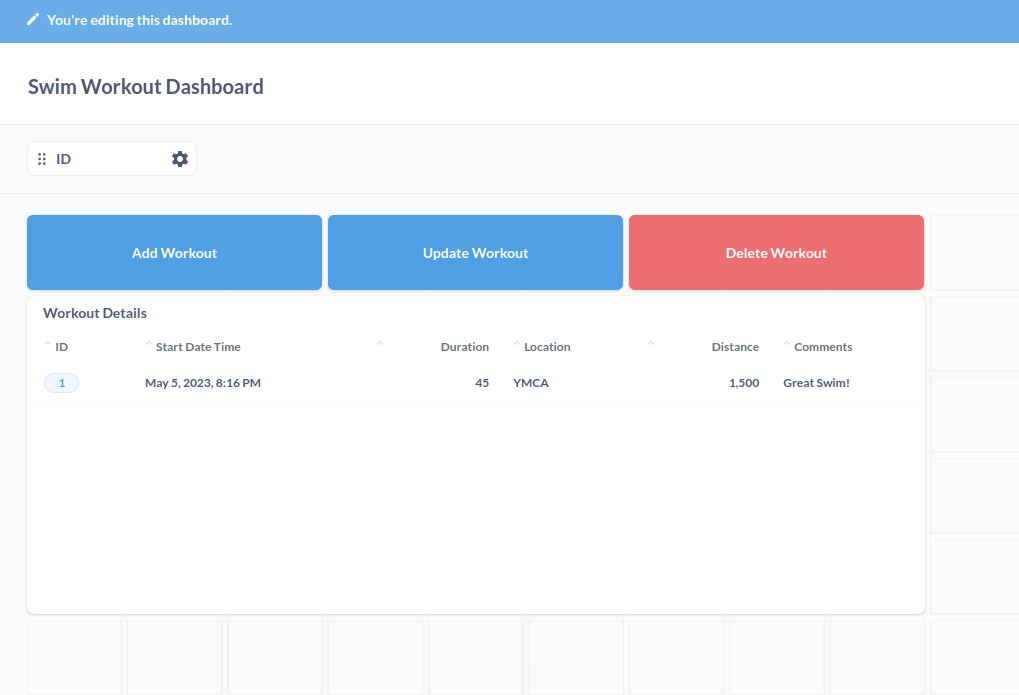
If the preview looks good, click the Visualize button to start working with a visual of the data. In this case, we won’t change anything since we want a table showing each record. We will add some more Questions later that summarize our data into charts. Click Save in the upper right and name the visual Workout Details and add a description like A list of each workout with comments.
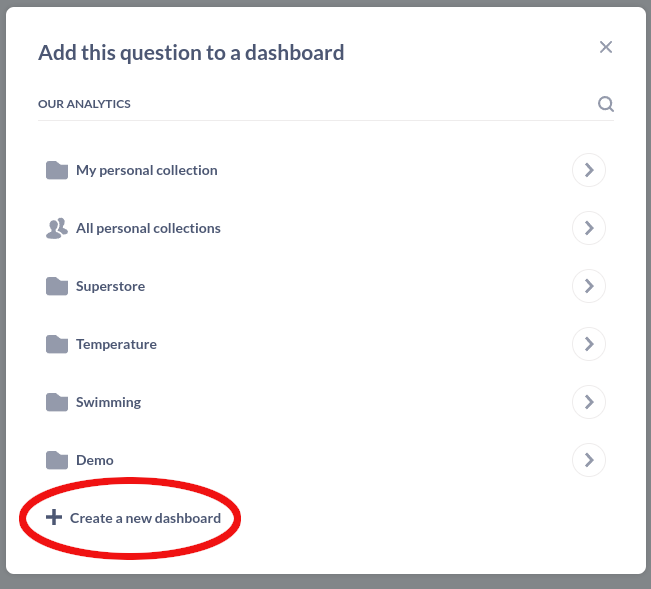
Add the Question to a Dashboard
Once you save the Question, Metabase will ask if you want to add it to a Dashboard. Let’s do that and add it to a new dashboard by selecting the Create a new dashboard option.
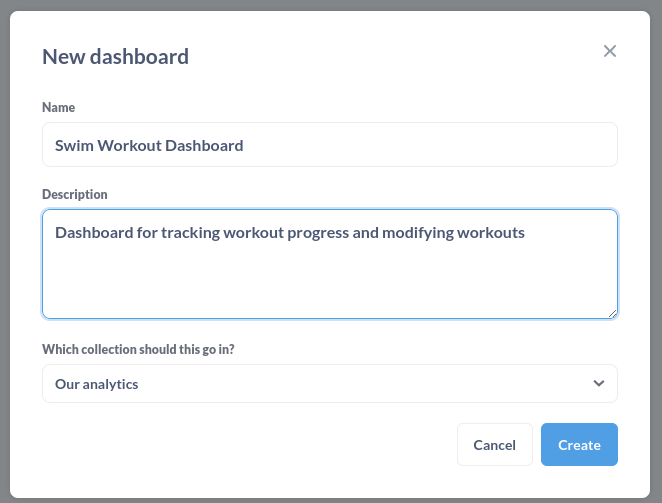
Give the dashboard a lovely name like Swim Workout Dashboard and a description Dashboard for tracking workout progress and modifying workouts
This should take you to the Dashboard editing screen with the Question we created earlier added as a table.
Metabase makes formatting a dashboard fairly easy by offering a grid where we can resize and move Questions around. It won’t give pixel-perfect precision like some other BI tools, but I think the ease of moving elements around and makes the trade off worth it.
Let’s resize the Workout Details Question so it’s 9 squares wide and 4 tall.
Add “Create” Action Button
It’s finally time to make our Actions come to life on the Dashboard! To add an Action, click the Add action button icon in the top right of the dashboard editing window.

A button has been added to your dashboard and a Button properties dialogue has opened on the right sidebar! We’ll use this dialogue to configure our button and choose which Action it will execute.
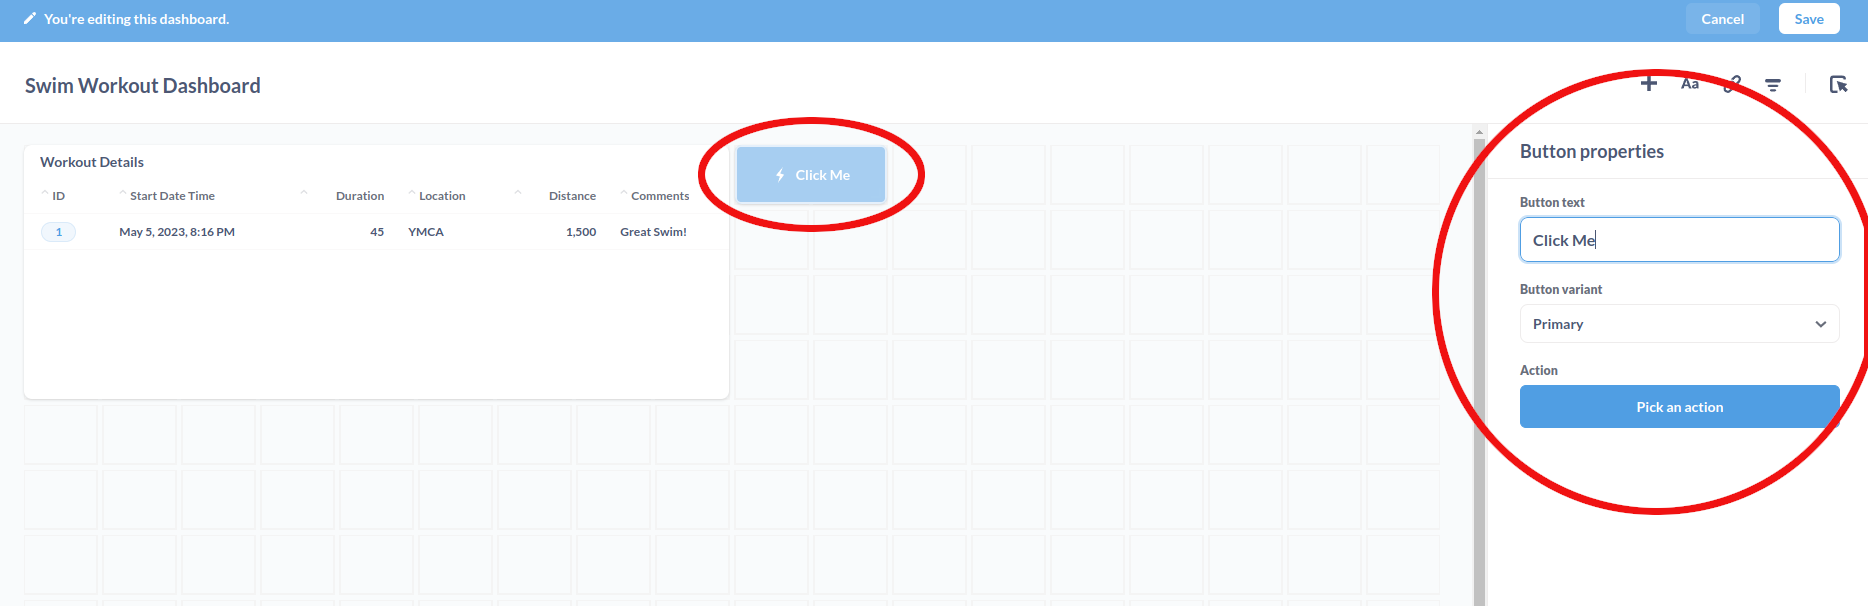
This button is going to use the Create Action to add a new record to our database.
Let’s start by entering an engaging and descriptive Button text like “Add Workout”. The Button variant dropdown menu will set the appearance of the button:
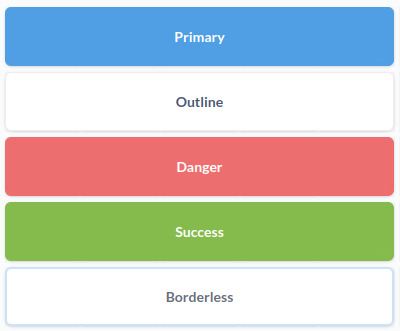
Let’s leave it as a Primary variant, we can come back and change this later if we want.
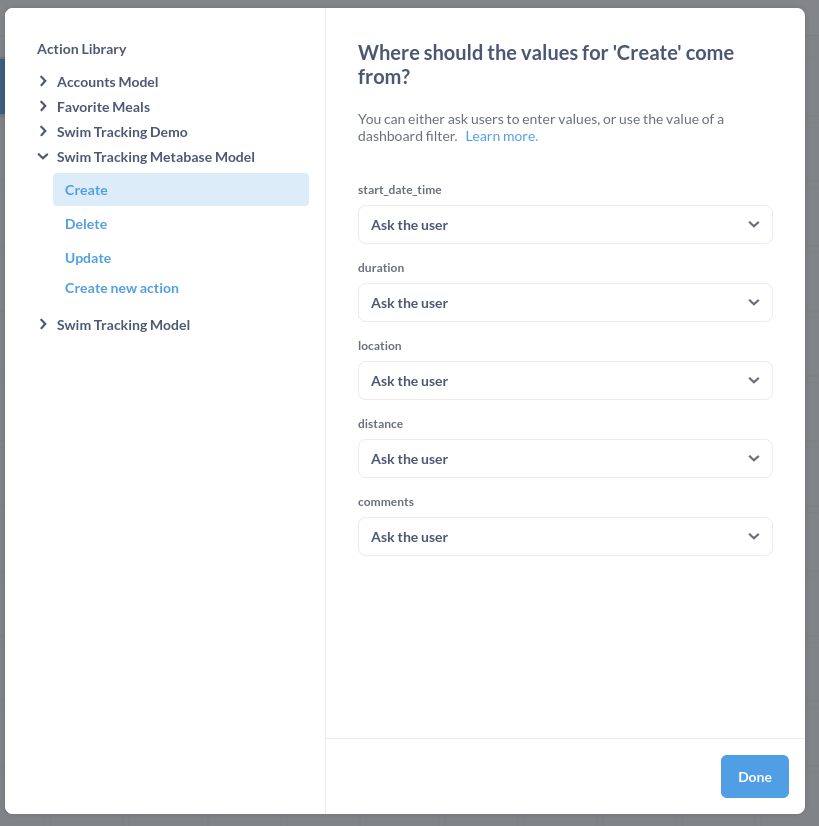
Next, we need to pick an Action by clicking the Pick an action button. This will open the Action Library where you can search for Actions we’ve created. These are arranged by Model, so let’s find the Actions associated with the Swim Tracking Metabase Model Model. Once you find the Model, expand the menu and it will show the 3 basic Actions we created.
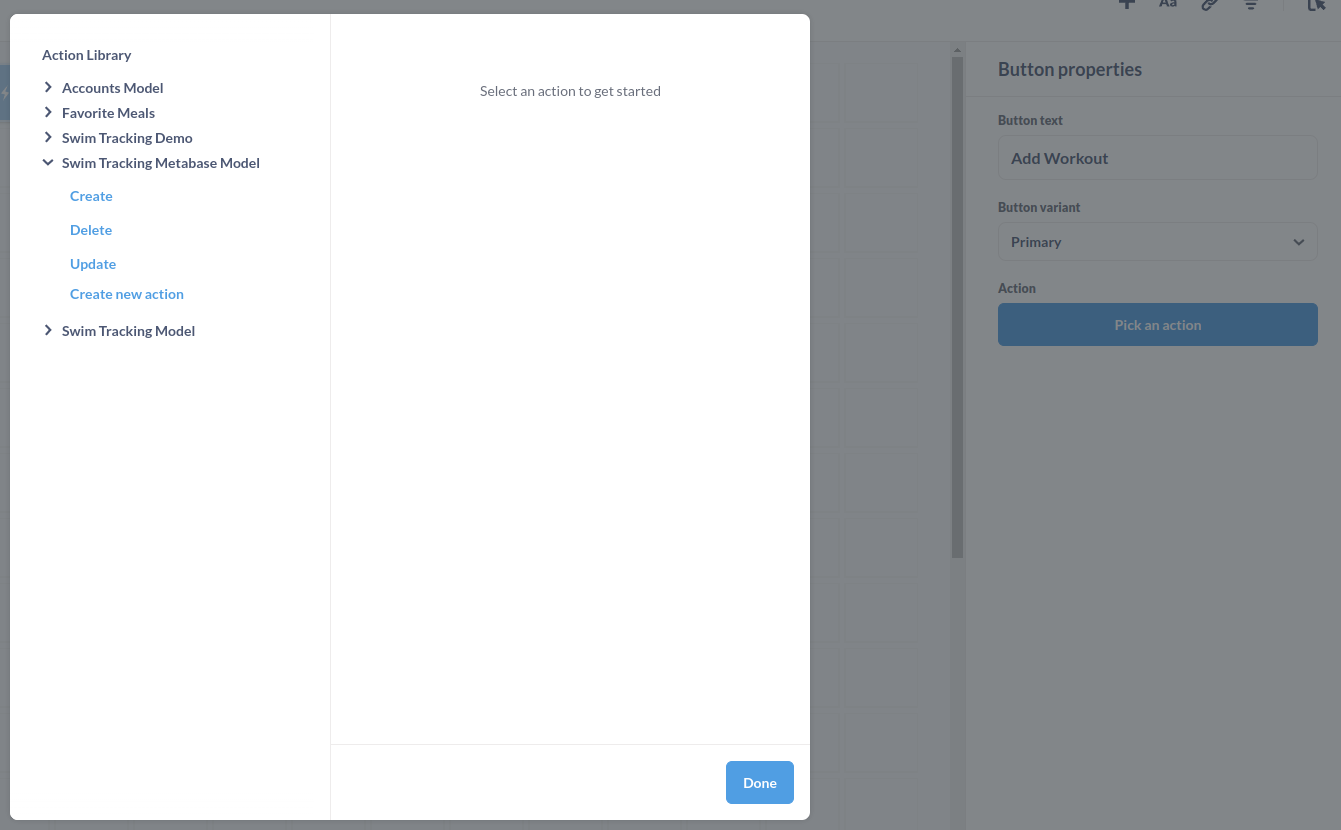
Select Create and leave the values for Where should the values for 'Create' come from? as their default “Ask the user”. By using this option, Metabase will create a form for the user to fill out when they click the button to add a workout.
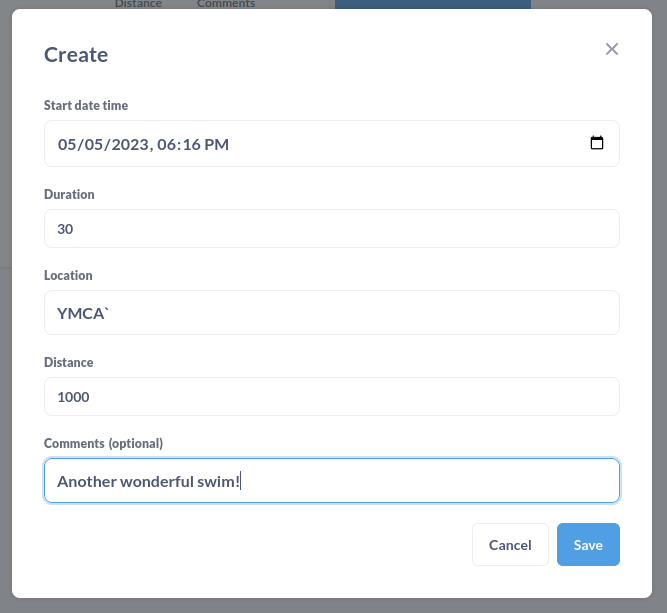
We should have our button all set up now! To test that it works, Save the dashboard by using the Save button in the upper right corner. This will take us out of edit mode and into view mode. Click the new button and it should open a form asking you to fill in the data for a new workout! The form is created based on the fields in our Model and their metadata.
Fill out the form with some data and when click save…
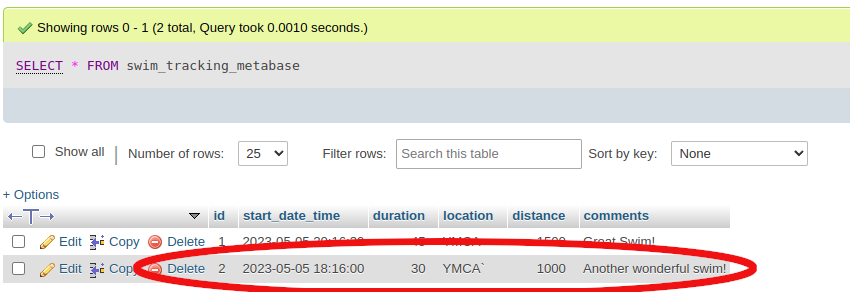
it should show on our Workout Details Question and…

if we query the database directly, the record has been written to the table there as well!
Set up a Dashboard Filter
Now that we are able to create new records, let’s create a button to update an existing record!
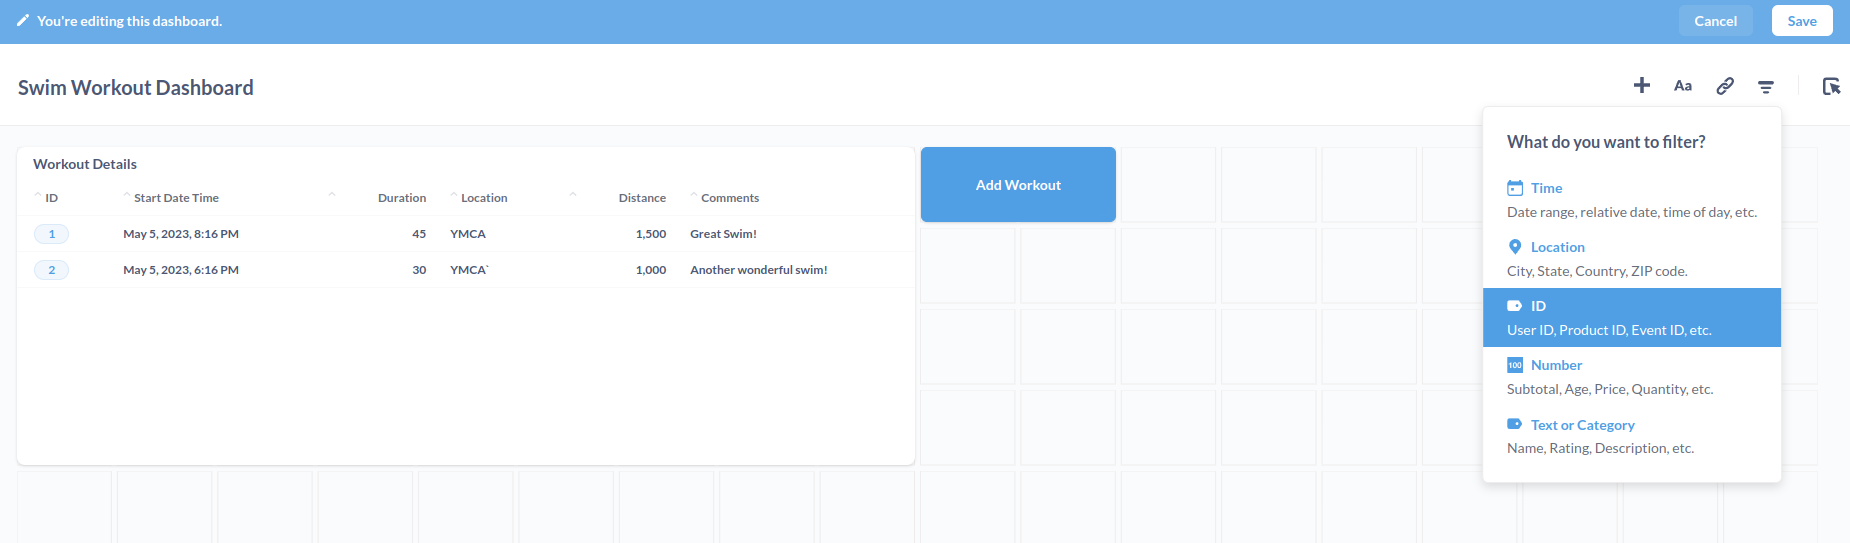
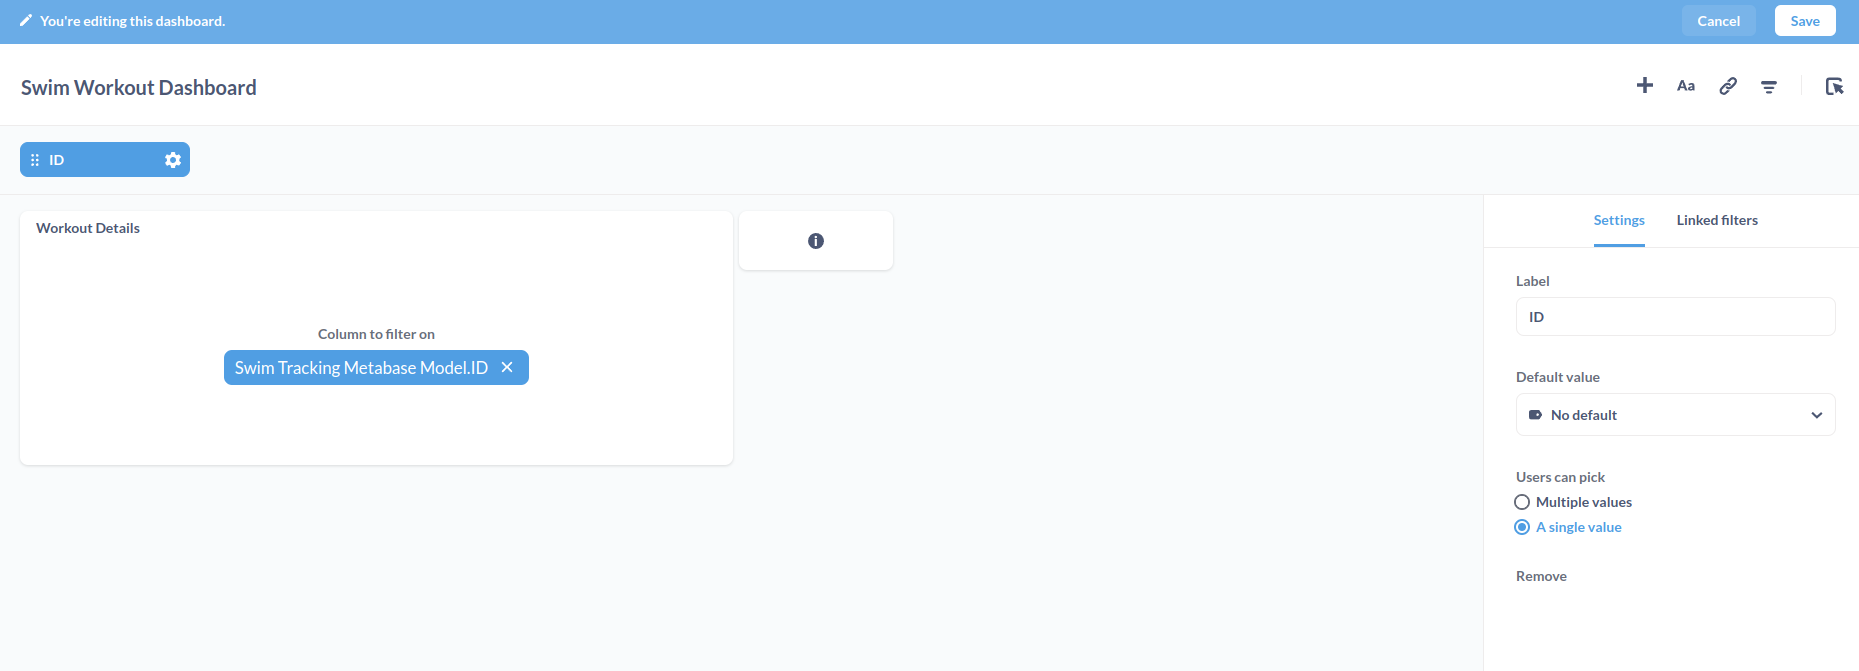
First, we need to add a filter to our dashboard. This will allow us to select a particular record we want to update. Back in edit mode on our Dashboard, click the Add a filter button on the upper right and select ID in the What do you want to filter dialogue.
In the filter settings menu, we can leave the Label as ID with no Default value and change the Users can pick to A single value. This will prevent users from trying to update multiple records at a time, which won’t allow the Action to function.
On the Workout Details Question, link the filter by selecting ID in the Column to filter on dialogue. This will link the filter to the Question. Click Done to save the Filter.
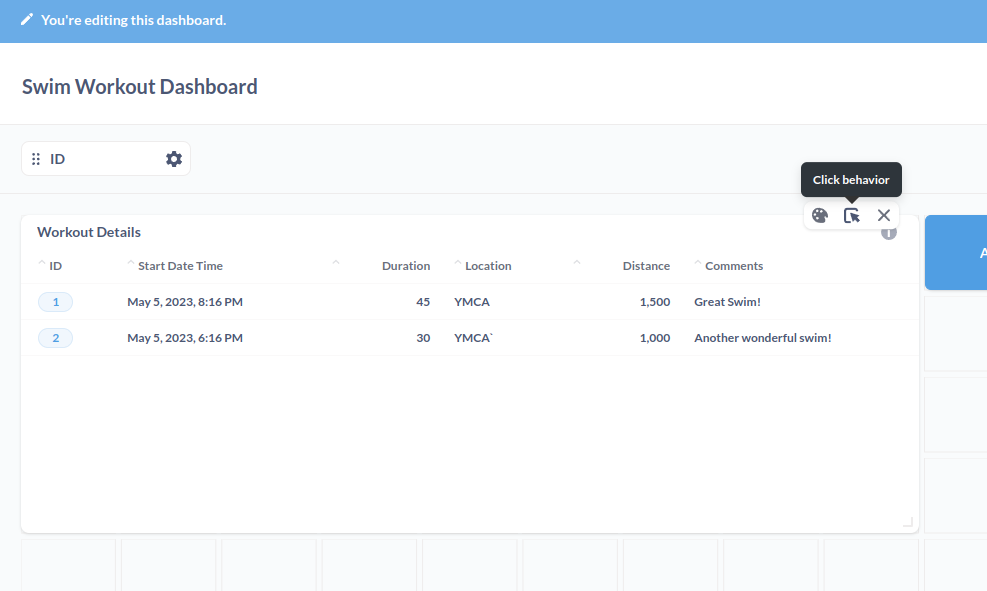
Now we have a Filter added to the top of our dashboard! We’re going to do one more change to allow us to click directly on a record in the Workout Details Question to choose a record. We can do this by hovering over the Workout Details Question and choosing the Click behavior option.
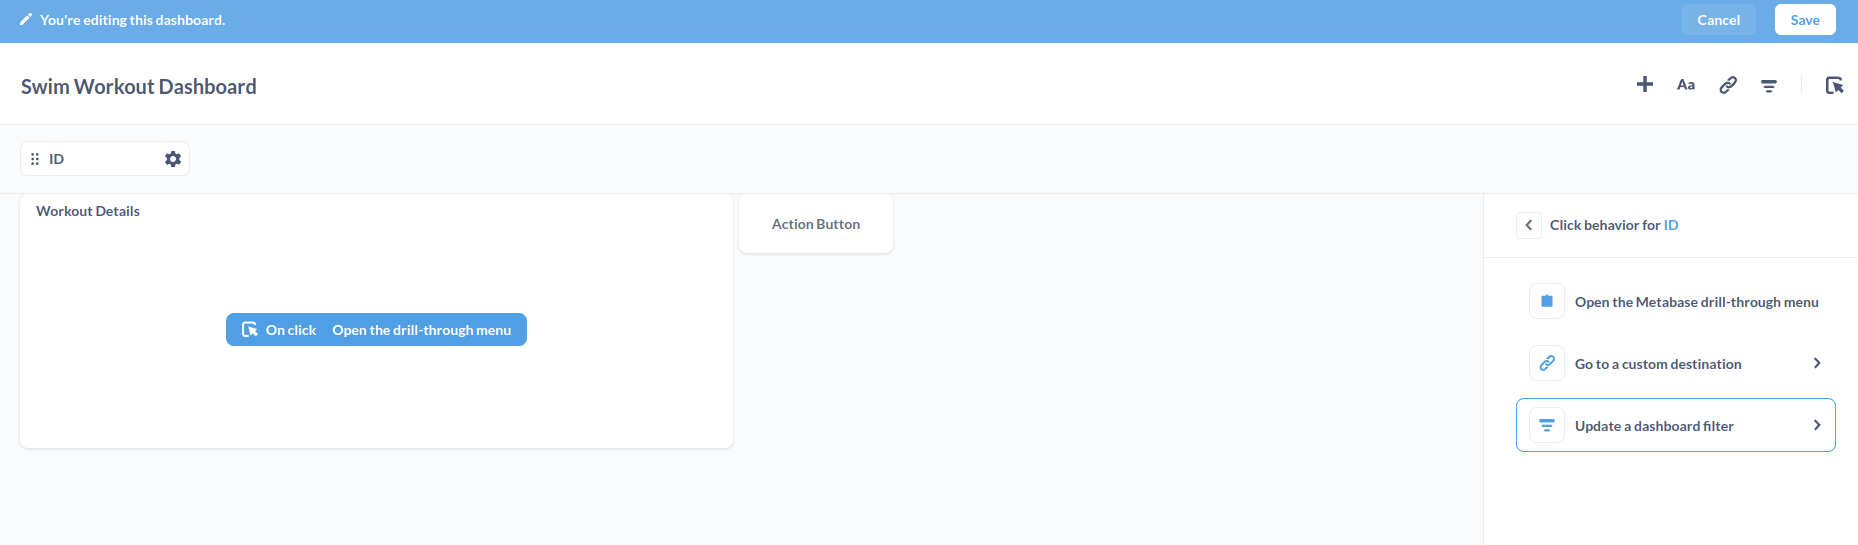
By default, Metabase’s “on-click” action is to provide a drill down. We want to change this for the ID field. In the configuration dialogue that opens, click ID to set the click behavior for the ID field and change it to Update a dashboard filter.
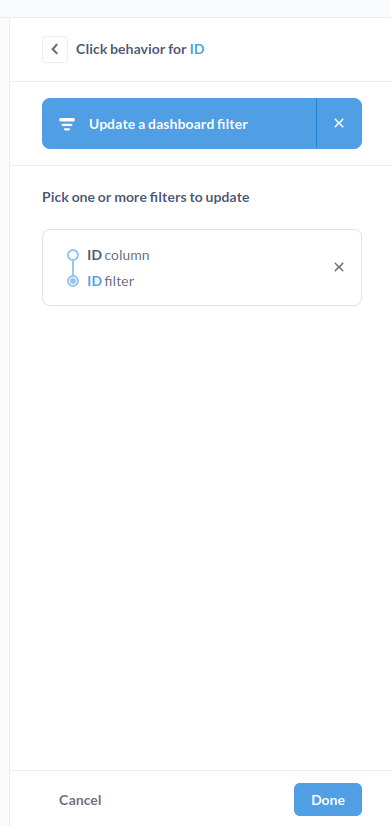
Select the ID filter from the Available filters menu and then select the ID field to link the filter to the field. Click Done to save your click behavior.
Try out the click behavior by saving the Dashboard, and selecting the record with ID = 1 and the dashboard filter should activate, displaying 1 for the value. Clear the filter by using the on click behavior again on the Question or by clearing the filter value on the top of the dashboard.
Add Update Button
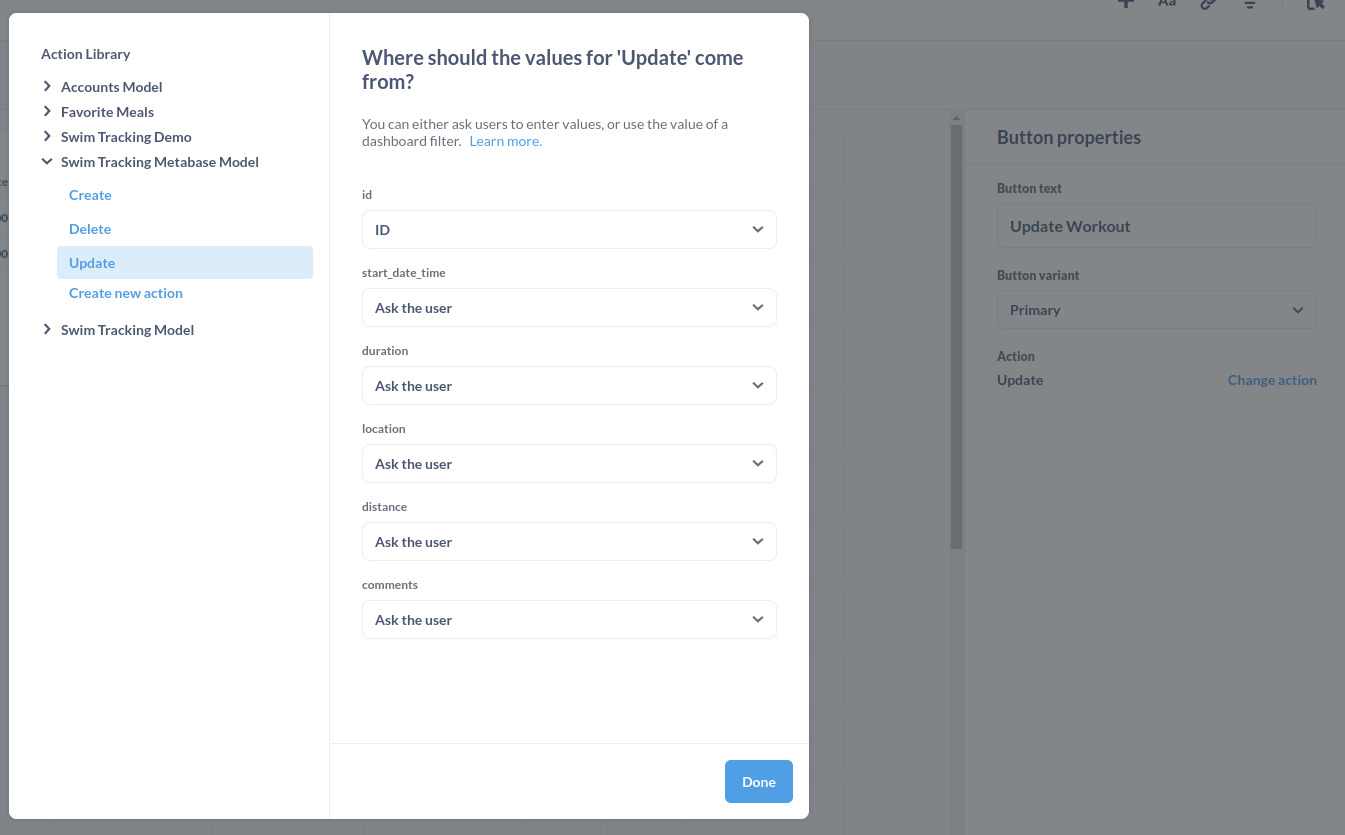
Like we did for the Create button, we’re going to start by clicking the Add action button icon on the upper right of the edit dashboard screen. This time, let’s give our button the text Update Workout, leave the variant as Primary, and find the Update Action we created for our Model. When configuring the Action, instead of leaving all the fields as Ask the user, we want to change the id field to ID. This will link that field to the filter we created and allow us to make changes to a specific record.
Click Done then Close, and our new Update Workout button should be visible on the dashboard! Save the dashboard and try this button out!
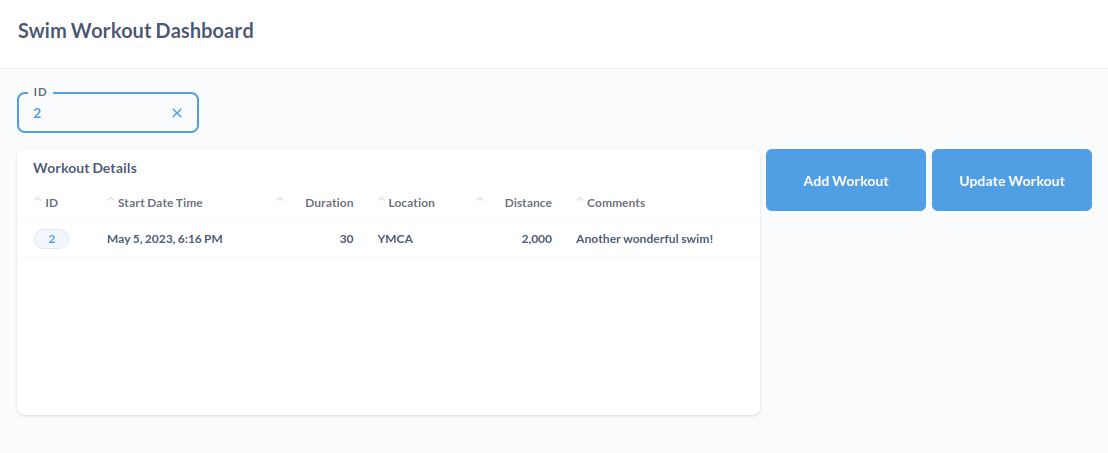
Be sure to select a record before clicking the button so the Action knows which record we want to update. Try updating the Distance field for the record we added (ID = 2) from 1000 to 2000.
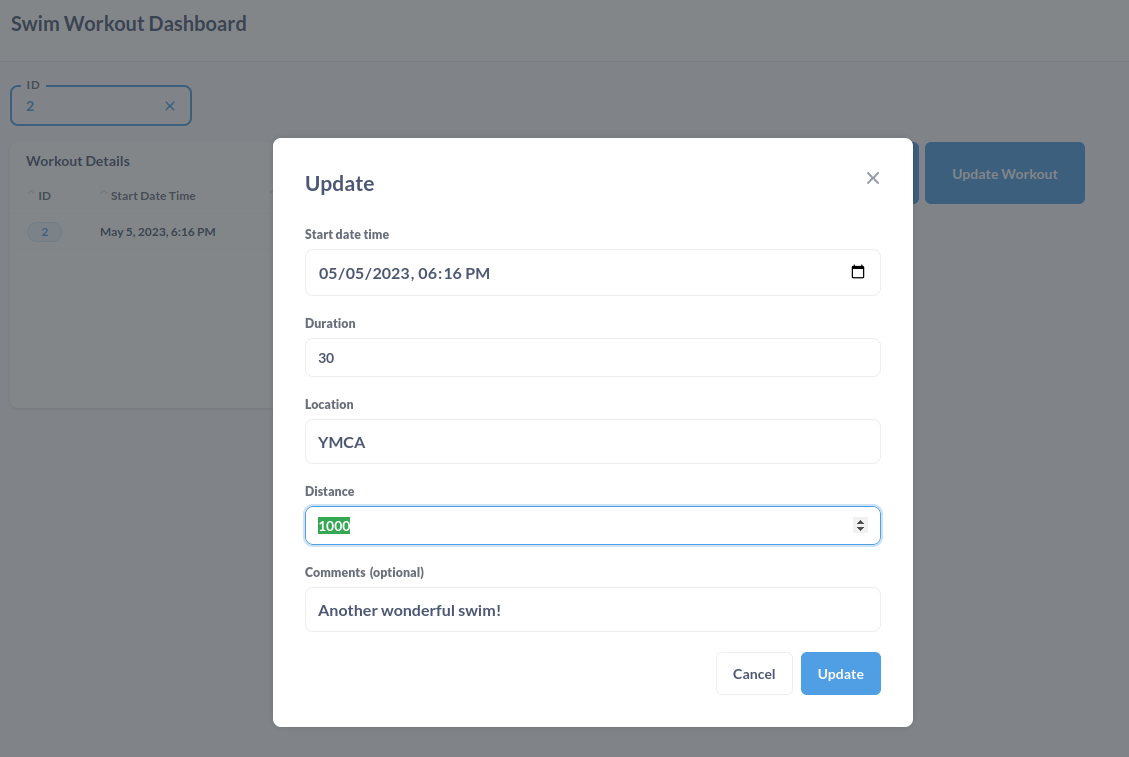
Click Update and the record will be updated in the Question and in your database table!
Add Delete Button
Before we get to configuring the Delete button, a brief word of caution!
This is an Action to be very careful with since it will completely delete records from the database. Remember, this isn’t just a chart being filtered or changed, the Action removes a record from the database permanently. Use this Action with care!
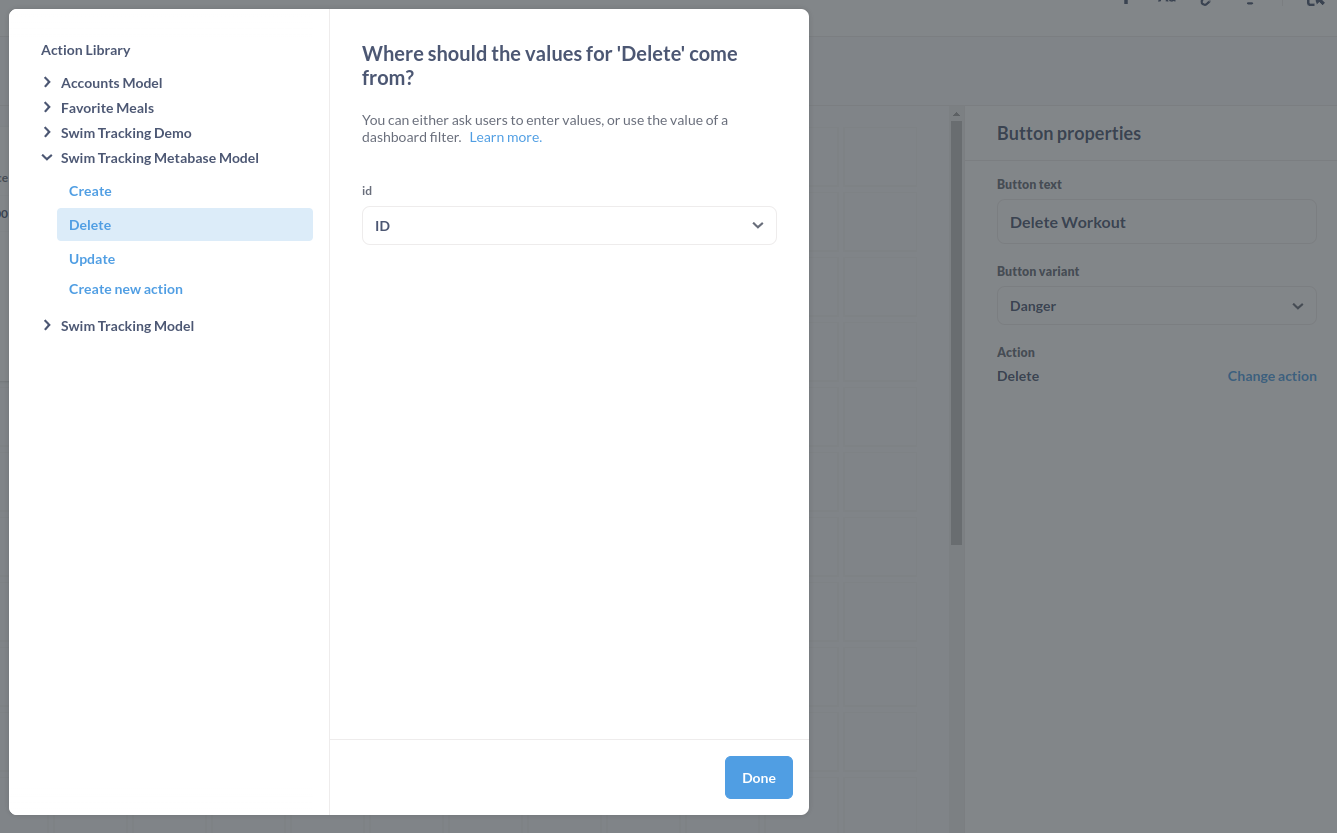
Adding the Delete button is the same process as the Update button, except we will choose the Danger Button variant and the Action will be our Delete Action.
Like with the Update button, we will link the id field to the ID filter.
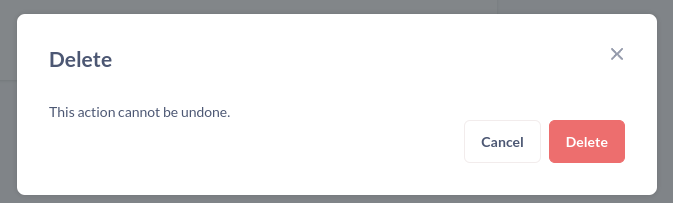
Once we complete the setup, there should be a red button added to the dashboard. Let’s delete record 2, which we added and updated earlier as part of this tutorial. Select it on the table to filter the dashboard, then click the Delete Workout button. Metabase will give a warning explaining that this Action can’t be undone, so again use care with this Action!
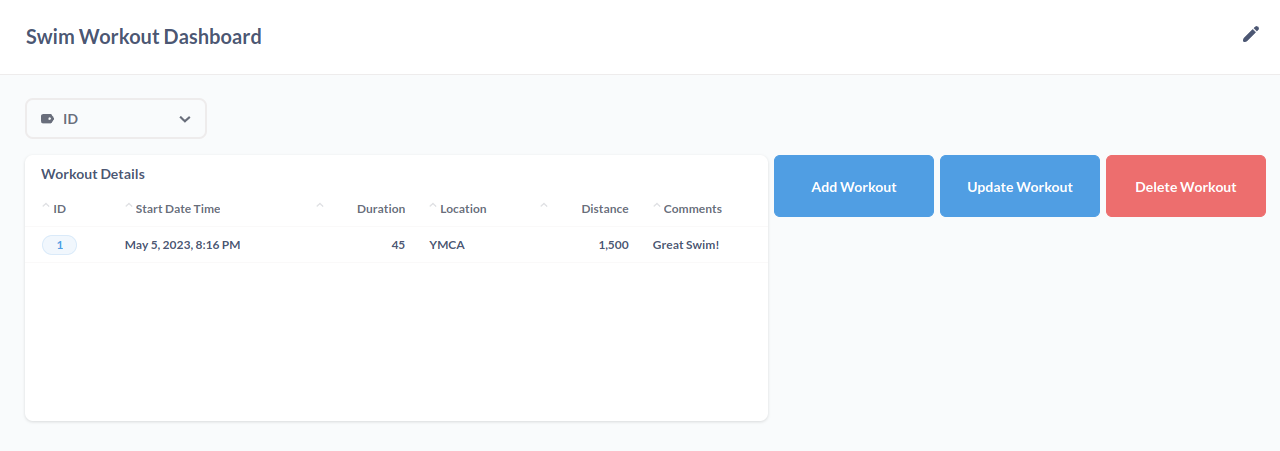
Click Delete and the record will be removed from the dashboard and database!
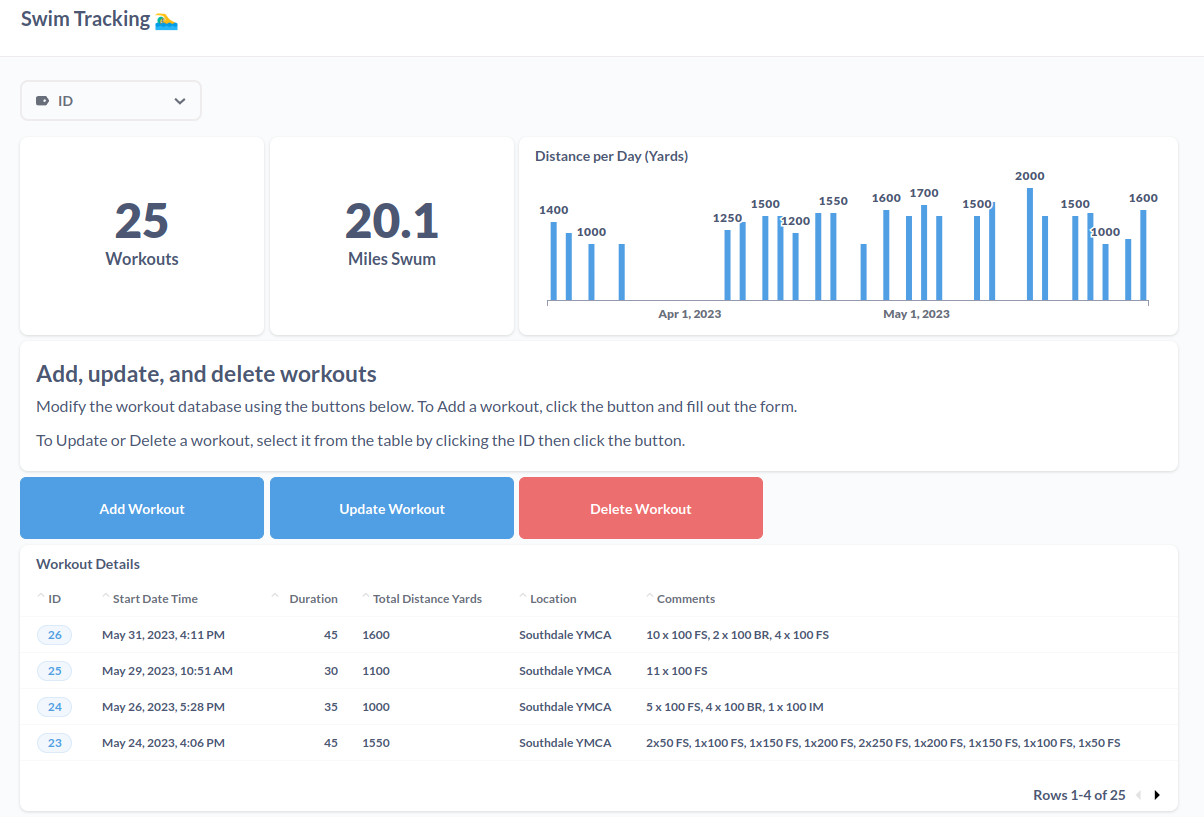
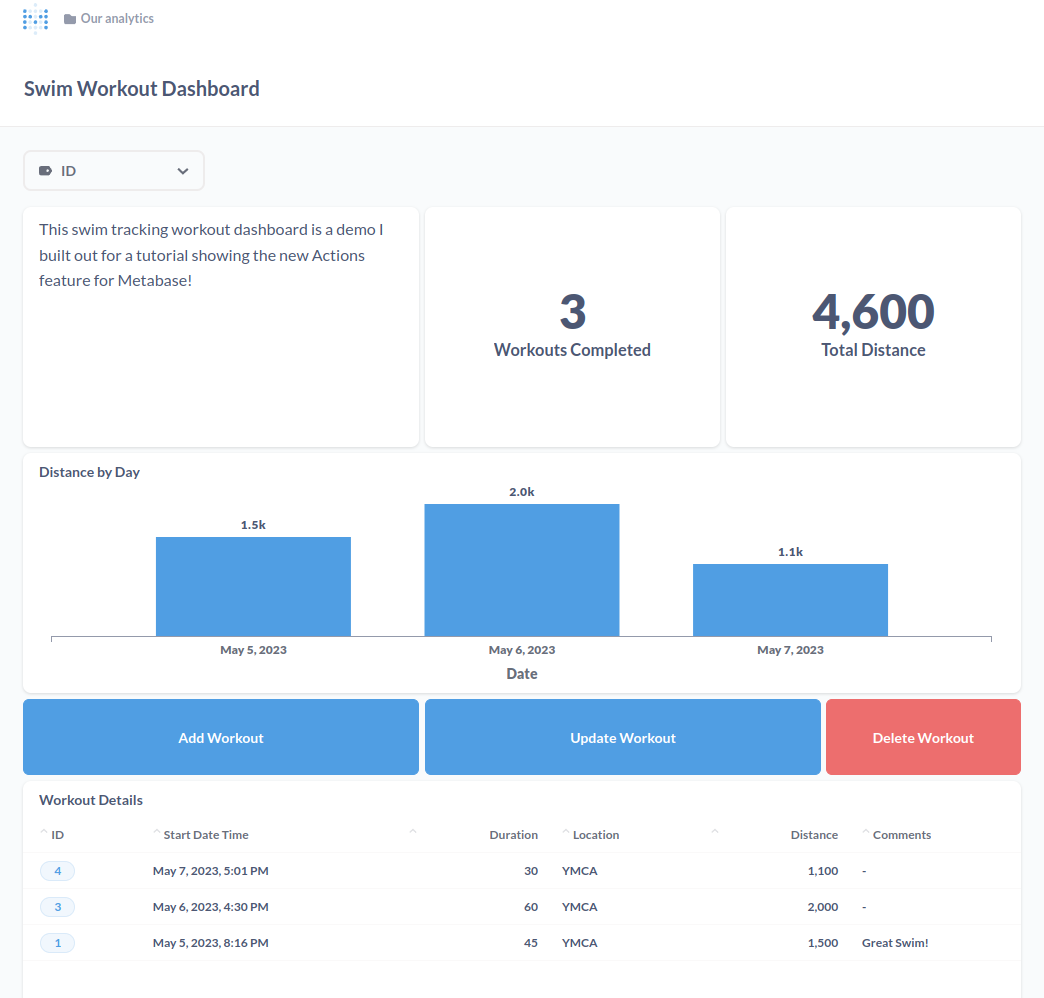
Dashboard Cleanup and Enrichment with other Questions
With that we are done with our Actions and dashboard! All of our functionality has been added, but the dashboard could use some more visual elements. At a minimum, let’s move the buttons to the top of the dashboard. This is simple to do in the dashboard’s edit mode, just drag the buttons to where they need to be. Let’s also make each button 3 units wide, to match the total width of our table Question.
This is a perfectly usable layout for data entry, feel free to add more Questions to your dashboard. Metabase has many options that are simple to add. I’ve added a few extra workouts in the below example to better show the visuals, feel free to experiment with different Questions and chart types to show trends in your data!
These posts help to improve my writing and crystallize my thoughts on topics relating to data, analytics, and product! Thanks for reading!